Repair to Blade Shells
Damage to outer laminate and core material
- Remove the topcoat coat around the damage as a first assessment of the damage.
- Remove the defective laminate and core from the damaged area until you reach healthy laminate and assess the extent of the damage. Check inner laminates are healthy.
- Measure the area around the repair with required measurements showing preparation for chamfering of laminate layers. Note; the number of layers damaged will determine the number of chamfers out from the main repair area. All overlaps must comply as a minimum with the requirement in the given work instructions.
- Prepare chamfers for lamination.
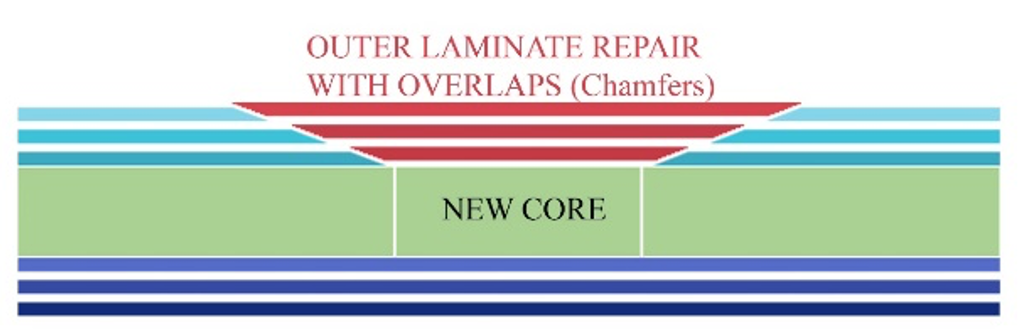
The repair of a shell damage that effects both outer laminate and core material should be done in 2 steps with an intermediate cure:
Step 1: New core placement.
After cure, sand or grind the new core to sit flush with existing healthy core.
Step 2: Outer layer repair.
- The inner laminate area for new core must be sanded and clean from any old core material.
- Apply a film of laminating resin mixed with fumed silica in the shell cavity where the new core will sit.
- Apply new core. The new core must fill the gap with a tolerance of no more than 2mm around the edges.
- Apply peel ply and vacuum materials.
- Once cured, remove vacuum equipment and sand the core flush with existing healthy core.
- Check all surfaces are clean, dust free and ready for outer layer laminations.
- Laminate outer layers. Apply peel ply and vacuum consumables.
- Allow to fully cure. Use a heating blanket to achieve full cure of laminate. Make sure to heat at required temperature as stated within the safety and technical data sheets.
- After curing, remove vacuum materials and grind/sand edges of repair to achieve a smooth finish.
- Fill the repair with filler and sand to regain blade profile.
- Mask off an area 100mm around the repair and apply paint/topcoat.